
Configuring Workspace Lists and the Record Page
On this page
In this lesson, you will learn:
- What agents can change for themselves
- What admins configure for everyone
- How to add columns to a workspace list
- How to change the workspace form layout
🔁 Quick look back: Last time: Working an Incident in Service Operations Workspace. You learned how an agent works an incident from New to Resolved in Service Operations Workspace.
1 “I can’t see the location!”
After a week of testing, Abel has a wish list.
- “The queue should show the caller’s location.”
- “And the service offering.”
- “And please move Caller to the top of the page.”
👉 The fix: add the columns everyone needs to the workspace lists, and tidy the record page.
2 Personal or for everyone?
| Change | Who | How |
|---|---|---|
| Hide or add a column just for me | Any agent | The list’s column settings, in the workspace |
| Add a column for all agents | Admin | Workspace list configuration |
| Move fields on the record page | Admin | The workspace form view, with Form Layout |
📝 Note: You configure. You don’t build new pages. Building new workspace pages is developer work, in UI Builder.
3 Lists for everyone
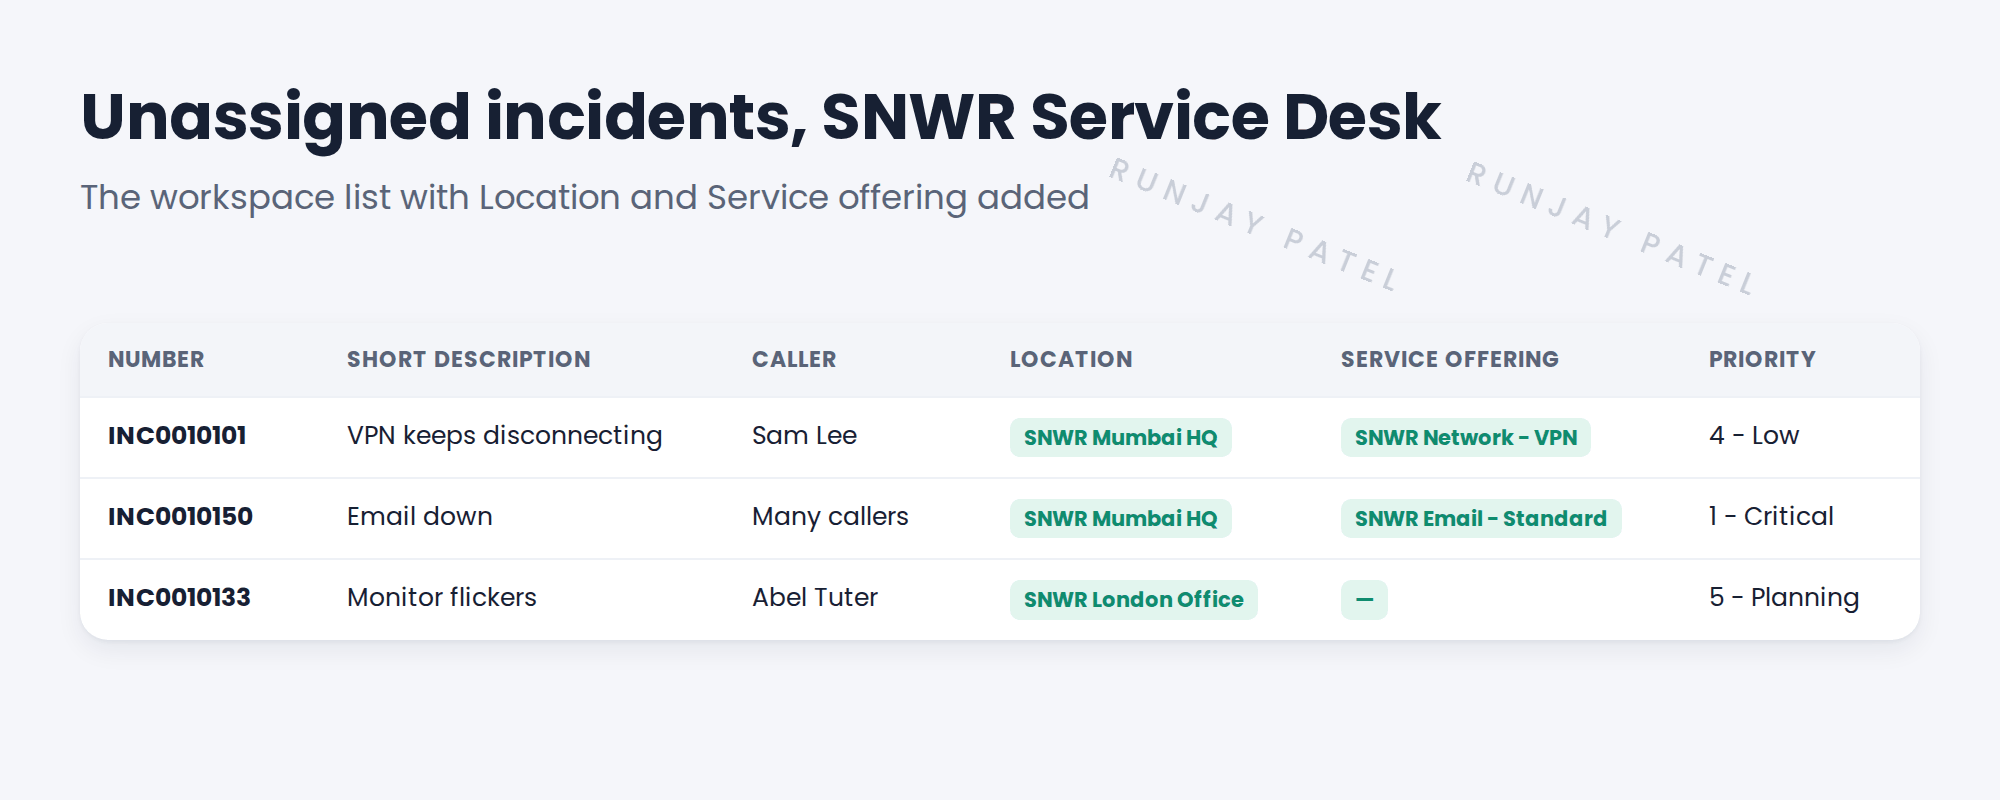
Workspace lists are set up by admins in the workspace list configuration. Find the list (for example “Unassigned incidents”), then add the columns.
💡 Good to know: Keep lists to 6 or 7 columns. More columns make the list hard to scan.
4 The record page
The workspace shows the incident form using its own form view. Change that view with Form Layout, just like a normal form.
💡 Good to know: Need a refresher? See Fundamentals › Form Configuration › Form Layout.
⚠️ Heads up: Change the workspace view, not the Default view. Otherwise you also change the classic form for admins.
5 Let’s try it: add a column and move a field
- In Service Operations Workspace, open an incident list. Use the list’s column settings to add Location just for you.
- As admin, find the workspace list configuration for incident lists (search “list” under Workspace Experience in the All menu).
- Add Service offering to the list for everyone.
- Open an incident in the classic UI, switch to the workspace form view, and use Form Layout to move Caller to the top.
- Refresh the workspace and check both changes.
6 Quick recap
- Agents can change columns for themselves
- Admins configure lists for everyone
- The record page uses its own workspace form view
- Keep lists short: 6 or 7 columns
- Configuration only. Building new pages is developer work
7 Check yourself
Think of your answer first. Then tap to check.
1 Abel wants a column just for himself. Who changes it? Show answer
Abel, from the list’s column settings.
2 Where do you add a column for all agents? Show answer
In the workspace list configuration, as an admin.
3 Which form view do you change for the workspace record page? Show answer
The workspace form view, not the Default view.
4 Is building a new workspace page part of this lesson? Show answer
No. That’s developer work in UI Builder.
Nice work! Agents now see what they need at a glance. 🎉
Next up: Contextual Search and Agent Assist
Was this lesson helpful?
Please log in to share lesson feedback.
Have a question or doubt?
Ask here and get help from instructors and fellow learners.
Only logged-in learners can post.