
Creating & Managing Users
On this page
In this lesson, you will learn:
- Where users are stored in ServiceNow
- How to create a new user, step by step
- The most important fields on a user record
- Why you deactivate users instead of deleting them
1 Users are records too
Every person who can log in to ServiceNow has a user record. All user records live in one table: the User table, sys_user.
Managing users is one of the most common admin jobs. New people join, people change teams, and people leave. 🧑🤝🧑
📝 Note: In big companies, users are often loaded automatically from a company directory, like Microsoft Entra ID or LDAP. But admins still need to know how users work, and small companies often add users by hand.
2 Create a new user
- Click All and type
users. Under User Administration, click Users. - Click New at the top of the list.
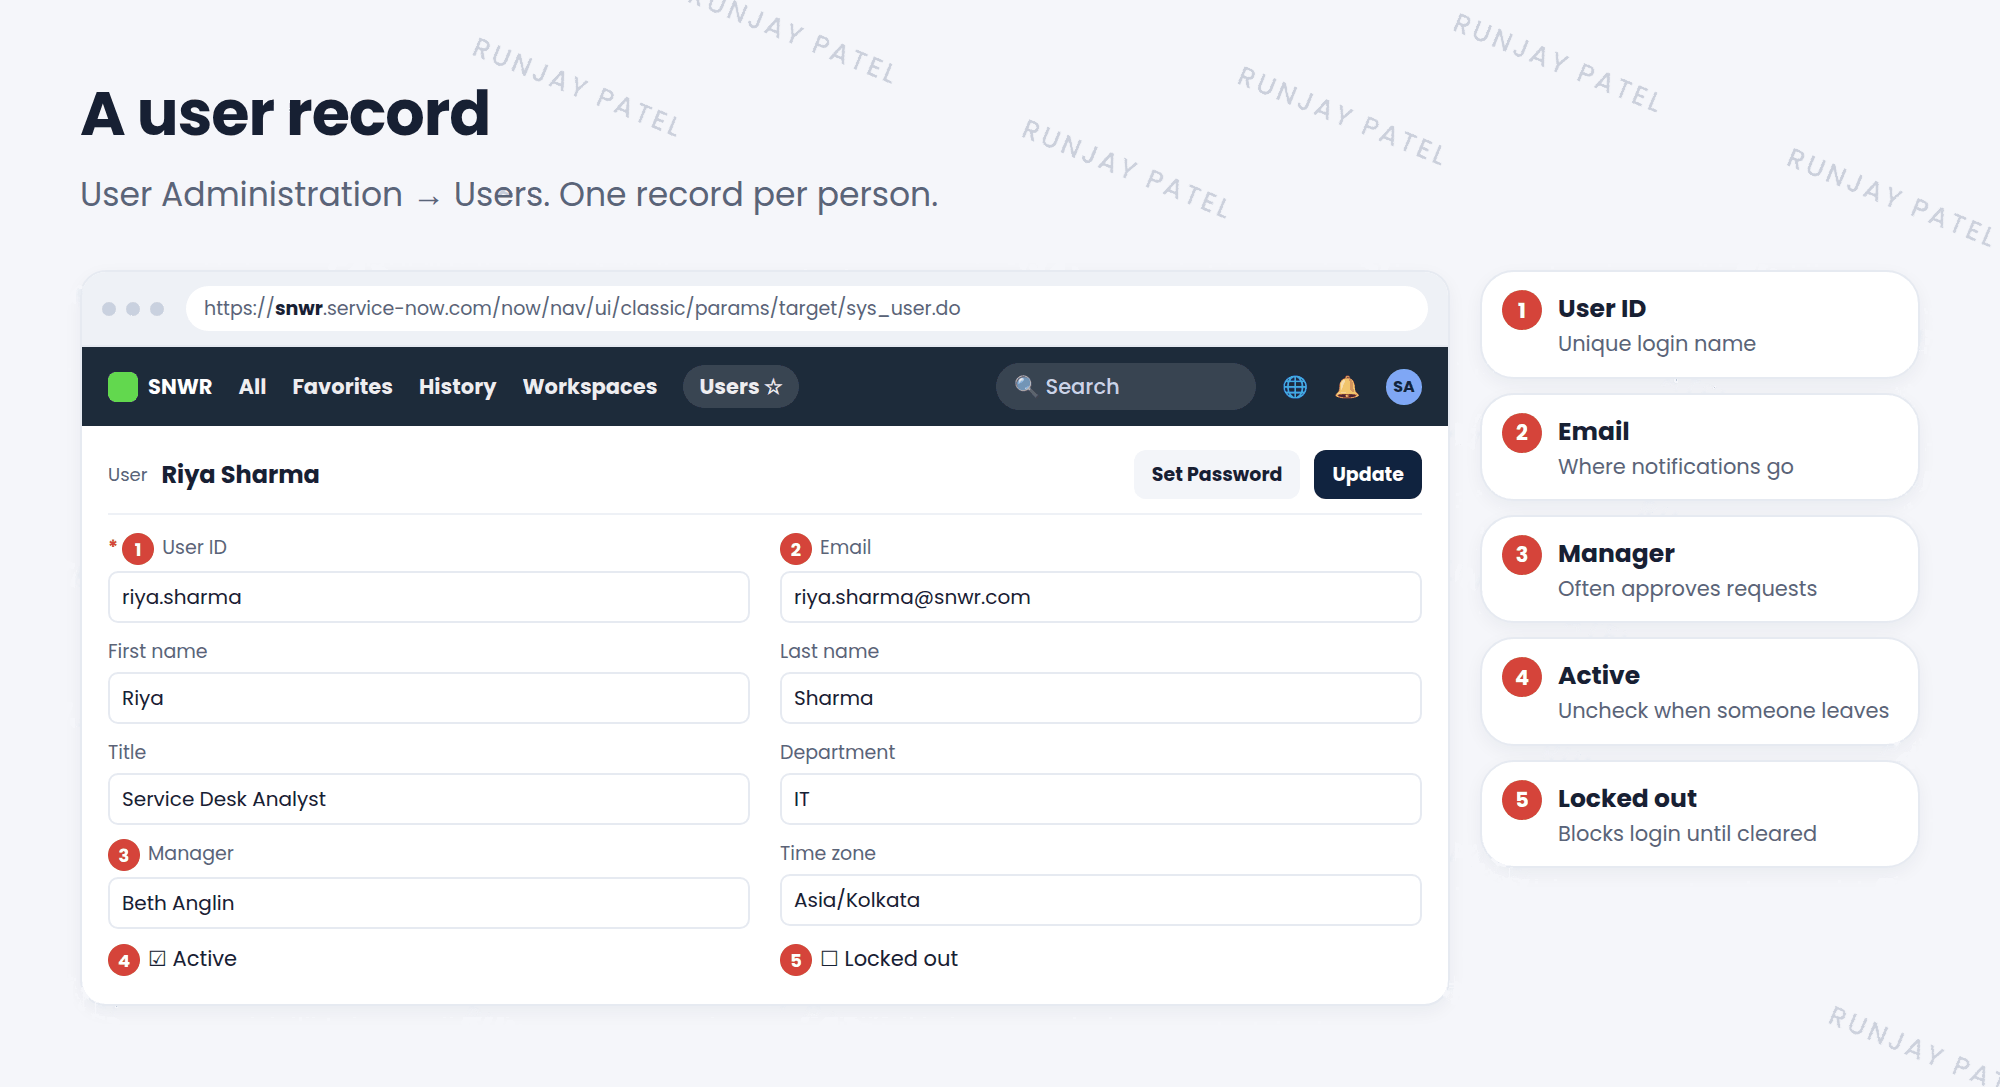
- Fill in the User ID, First name, Last name, and Email.
- Fill in other useful fields, like Title, Department, Manager, and Time zone.
- Click Submit. The new user is saved. ✅
- Open the user again and click Set Password to give them a password.
3 Important fields
| Field | Why it matters |
|---|---|
| User ID | The name the person logs in with. It must be unique |
| Where notifications go | |
| Manager | Often the person who approves their requests |
| Department and Location | Used for routing tickets, reports, and security |
| Time zone | The default time zone they see |
| Active | Only active users can log in |
| Locked out | Blocks login, for example after too many wrong passwords |
Key term: User ID
The unique login name, like riya.sharma. Two users can have the same full name, but never the same User ID.
4 Never delete a user
When someone leaves the company, it’s tempting to delete their user record. Don’t! 🛑
- Their name is on old incidents, approvals, and comments.
- Deleting them can break those links and lose history.
- Instead, uncheck Active. They can’t log in, but their history stays.
⭐ Remember: People leave → deactivate, don’t delete. People get locked out → uncheck Locked out (and maybe reset their password).
⚠️ Heads up: A user with no roles can still log in, but they’ll only see self-service pages. To let them do more, add them to a group with the right roles. You’ll learn how in Lessons 6.2 and 6.3.
5 Let’s try it: create a test user
- Go to User Administration > Users and click New.
- Create a user: User ID
riya.sharma, First name Riya, Last name Sharma, Email[email protected]. - Set Manager to any demo user, like Beth Anglin. Click Submit.
- Open Riya’s record and click Set Password. Set a password and save it somewhere safe.
- Find Riya in the Users list. Uncheck Active on her record, save, then check it again. You just “deactivated” and “reactivated” a user!
💡 Good to know: Keep Riya. You’ll use her again in the next lessons for groups, roles, and impersonation.
6 Quick recap
- Users live in the User table,
sys_user - Create users from User Administration > Users > New
- The User ID is the unique login name
- Email, manager, department, and time zone make the rest of ServiceNow work well
- Deactivate users who leave. Never delete them
7 Check yourself
Think of your answer first. Then tap to check.
1 What is the name of the table that stores users? Show answer
sys_user (the User table).
2 An employee leaves SNWR. What should you do with their user record? Show answer
Uncheck Active to deactivate it. Don’t delete it.
3 Two people are both named “Alex Kim”. Can they both be users? Show answer
Yes, as long as each has a different User ID.
4 A user typed the wrong password too many times and can’t log in. Which field do you check? Show answer
Locked out.
Nice work! You finished this lesson. 🎉
Was this lesson helpful?
Please log in to share lesson feedback.
Have a question or doubt?
Ask here and get help from instructors and fellow learners.
Only logged-in learners can post.